

Introduction
Welcome back to the second installment of the series! 🚀
Missed out on the first part? I recommend spending a few minutes to dive into the initial article for a comprehensive introduction to Live Activities. It'll set you up perfectly to navigate through this sequel smoothly.
In the introduction article, you explored the new capabilities introduced by Apple in iOS 16.1 and got your hands dirty with Xcode - a tool that's gradually becoming a familiar friend, right?
You started off with a basic emoji picker template provided by Xcode, a nice little exercise to dip our toes in the water.
But let's be honest, you're here for the real deal. So, it's time to bid farewell to the auto-generated code and start infusing some Live Activity magic.
What will you build?
If you've read some of my previous articles, you might have noticed I have a thing for timers.
Live Activities are an ideal match for keeping an eye on relevant content that gets updated quickly.
Picture this: You're a gym enthusiast in the midst of an intense workout session, looking to track your breaks between sets with your favorite app. Traditionally, this app would feature a timer displayed on the screen. But, you're all about maximizing your time, so you decide to text your best friend during these breaks.
In the world before Live Activities, you'd lose sight of your timer while texting. Sure, you could design your app to send a notification when the timer hits zero, but wouldn't it be better to refocus before it's all over?
This scenario is a prime example of where Live Activities shine, and that's exactly what you'll build in this article.
Get ready to venture once again beyond the realm of TypeScript, as this project involves crafting a Native Module and diving into some Swift code 😉.
Dynamic Island Designs
As a 10x proper engineer, I always start by understanding the specifications. So, what's better than taking a sneak peek
at the Dynamic Island designs I've (yes, that's me, doubling as the design team) crafted for the various presentation modes?
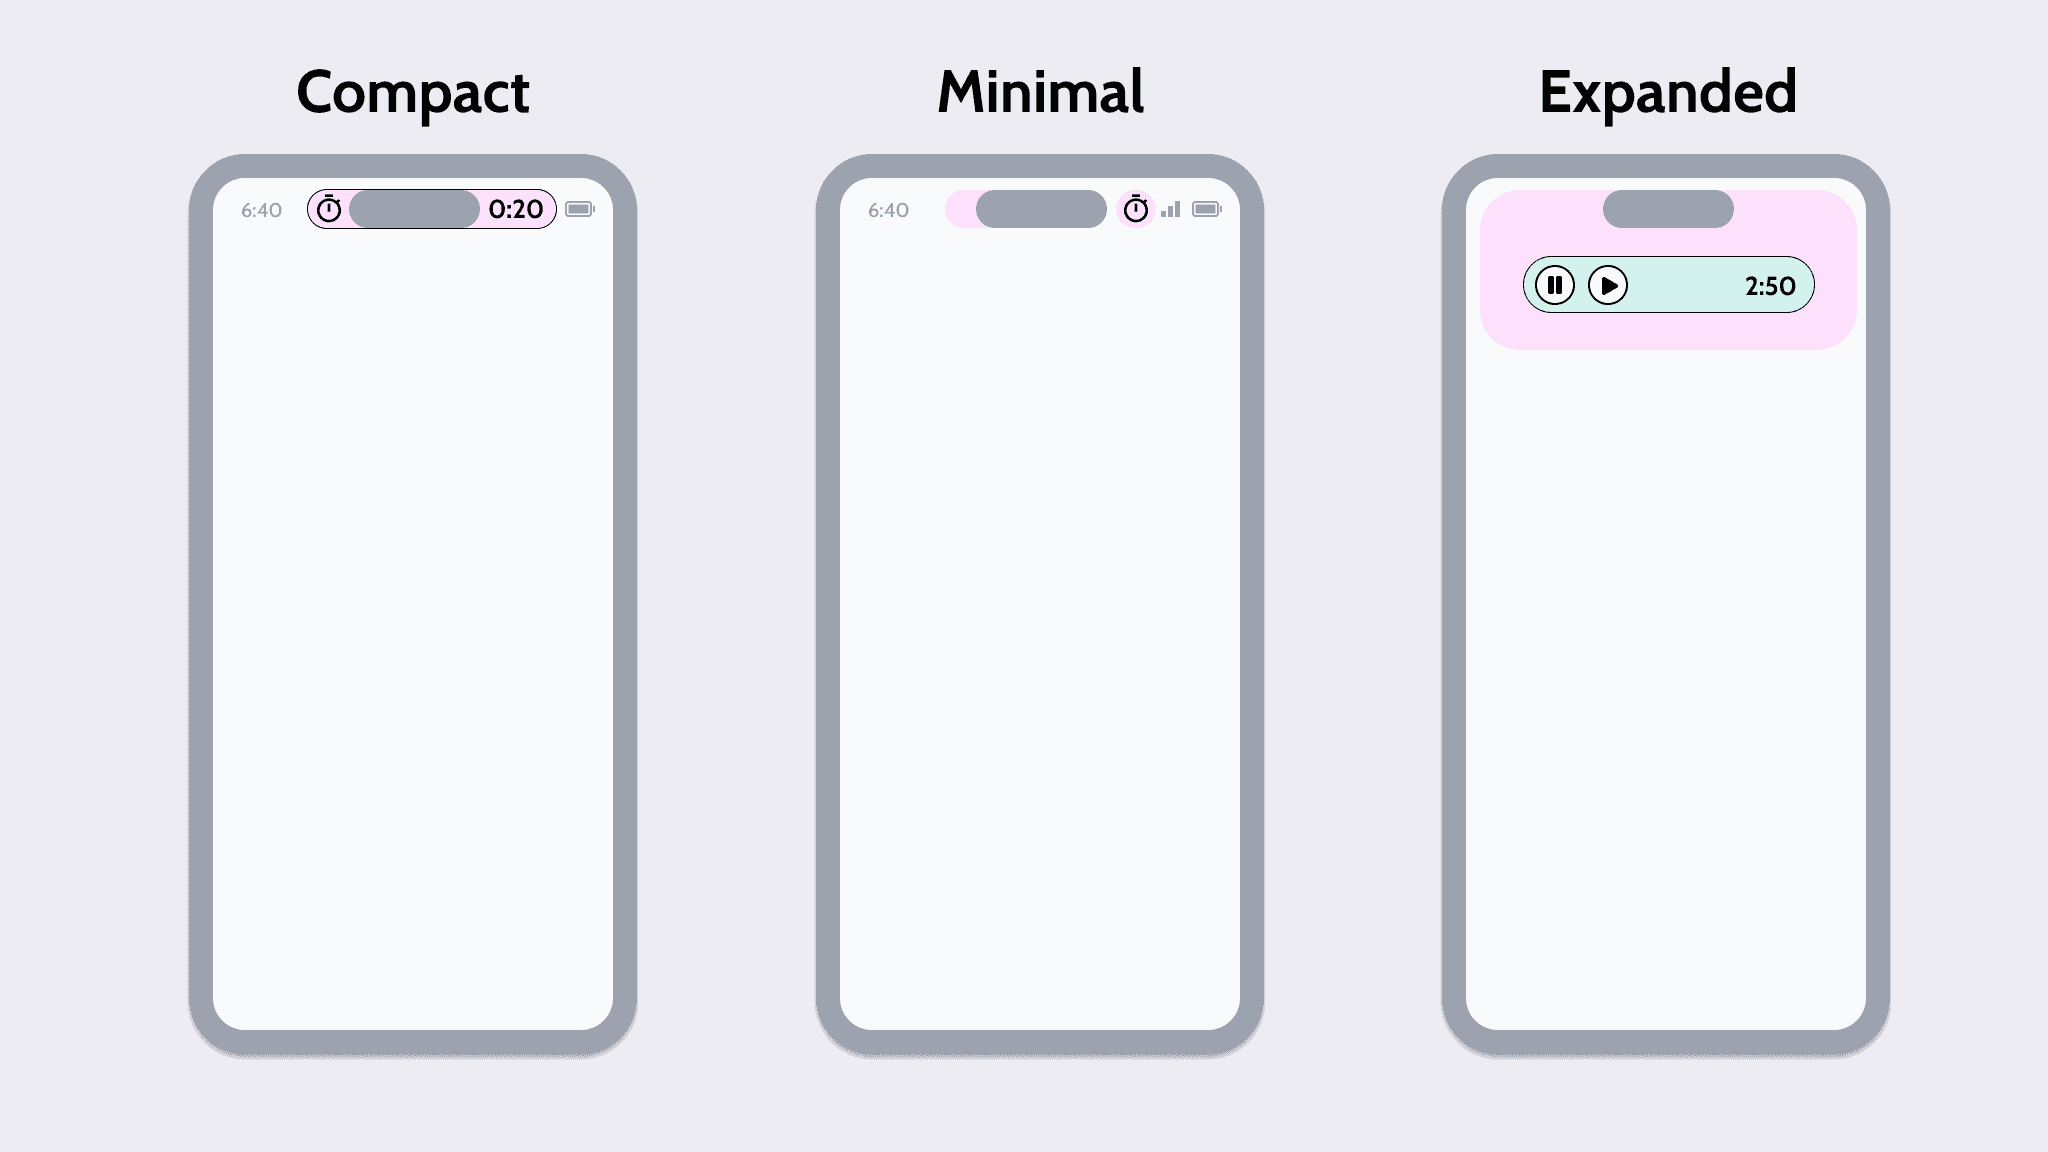
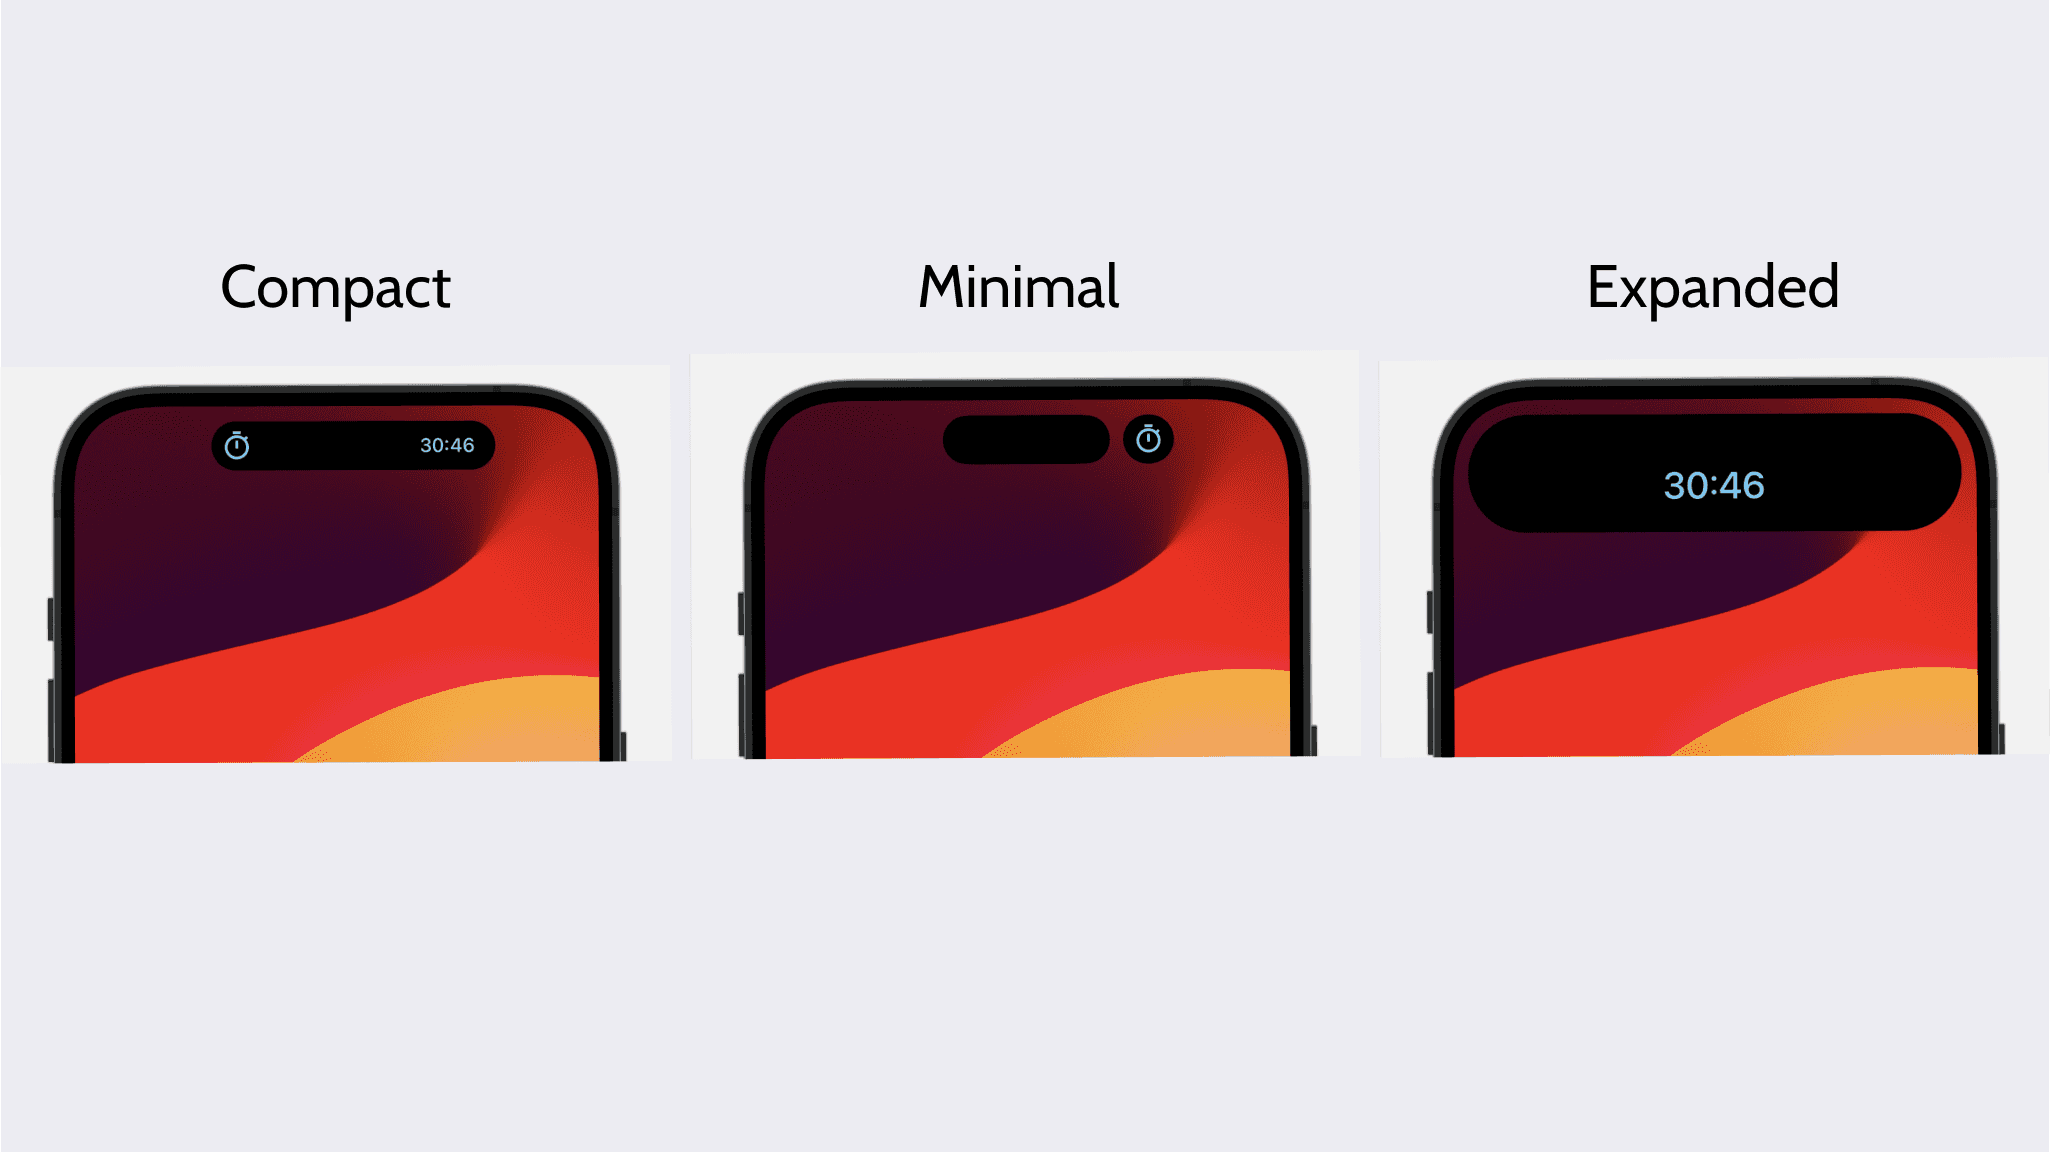
In both the Compact and Minimal presentations, the Live Activity will showcase the timer counter and its corresponding icon. This approach efficiently conveys crucial information, given the limited space available.
On the other hand, in the Expanded presentation, the timer counter will be paired with a couple of control buttons: one to pause the timer and another to cancel it.
This design ensures you have the essential functions at your fingertips, balancing aesthetics with practicality.
Native Module
A React Native native module allows you to execute arbitrary native code (like Swift, Objective-C, Java, or Kotlin) from within JS. This is particularly useful when you need to access platform-specific functionality that is not exposed through the React Native framework itself, as it's the case of iOS Live Activities.
In this article, you'll create a native module that will expose the necessary methods for React Native to interact seamlessly with the live activity. To help you out, I've also prepared a complementary repository with different branches that point to different stages of your progress, so you can follow along nicely. Those branches will be referenced later on whenever a specific step is completed.
Just a quick heads-up: it's crucial that you've already set up a Widget Extension with Xcode. This is key to following along with the upcoming steps.
iOS Module and Bridge Files
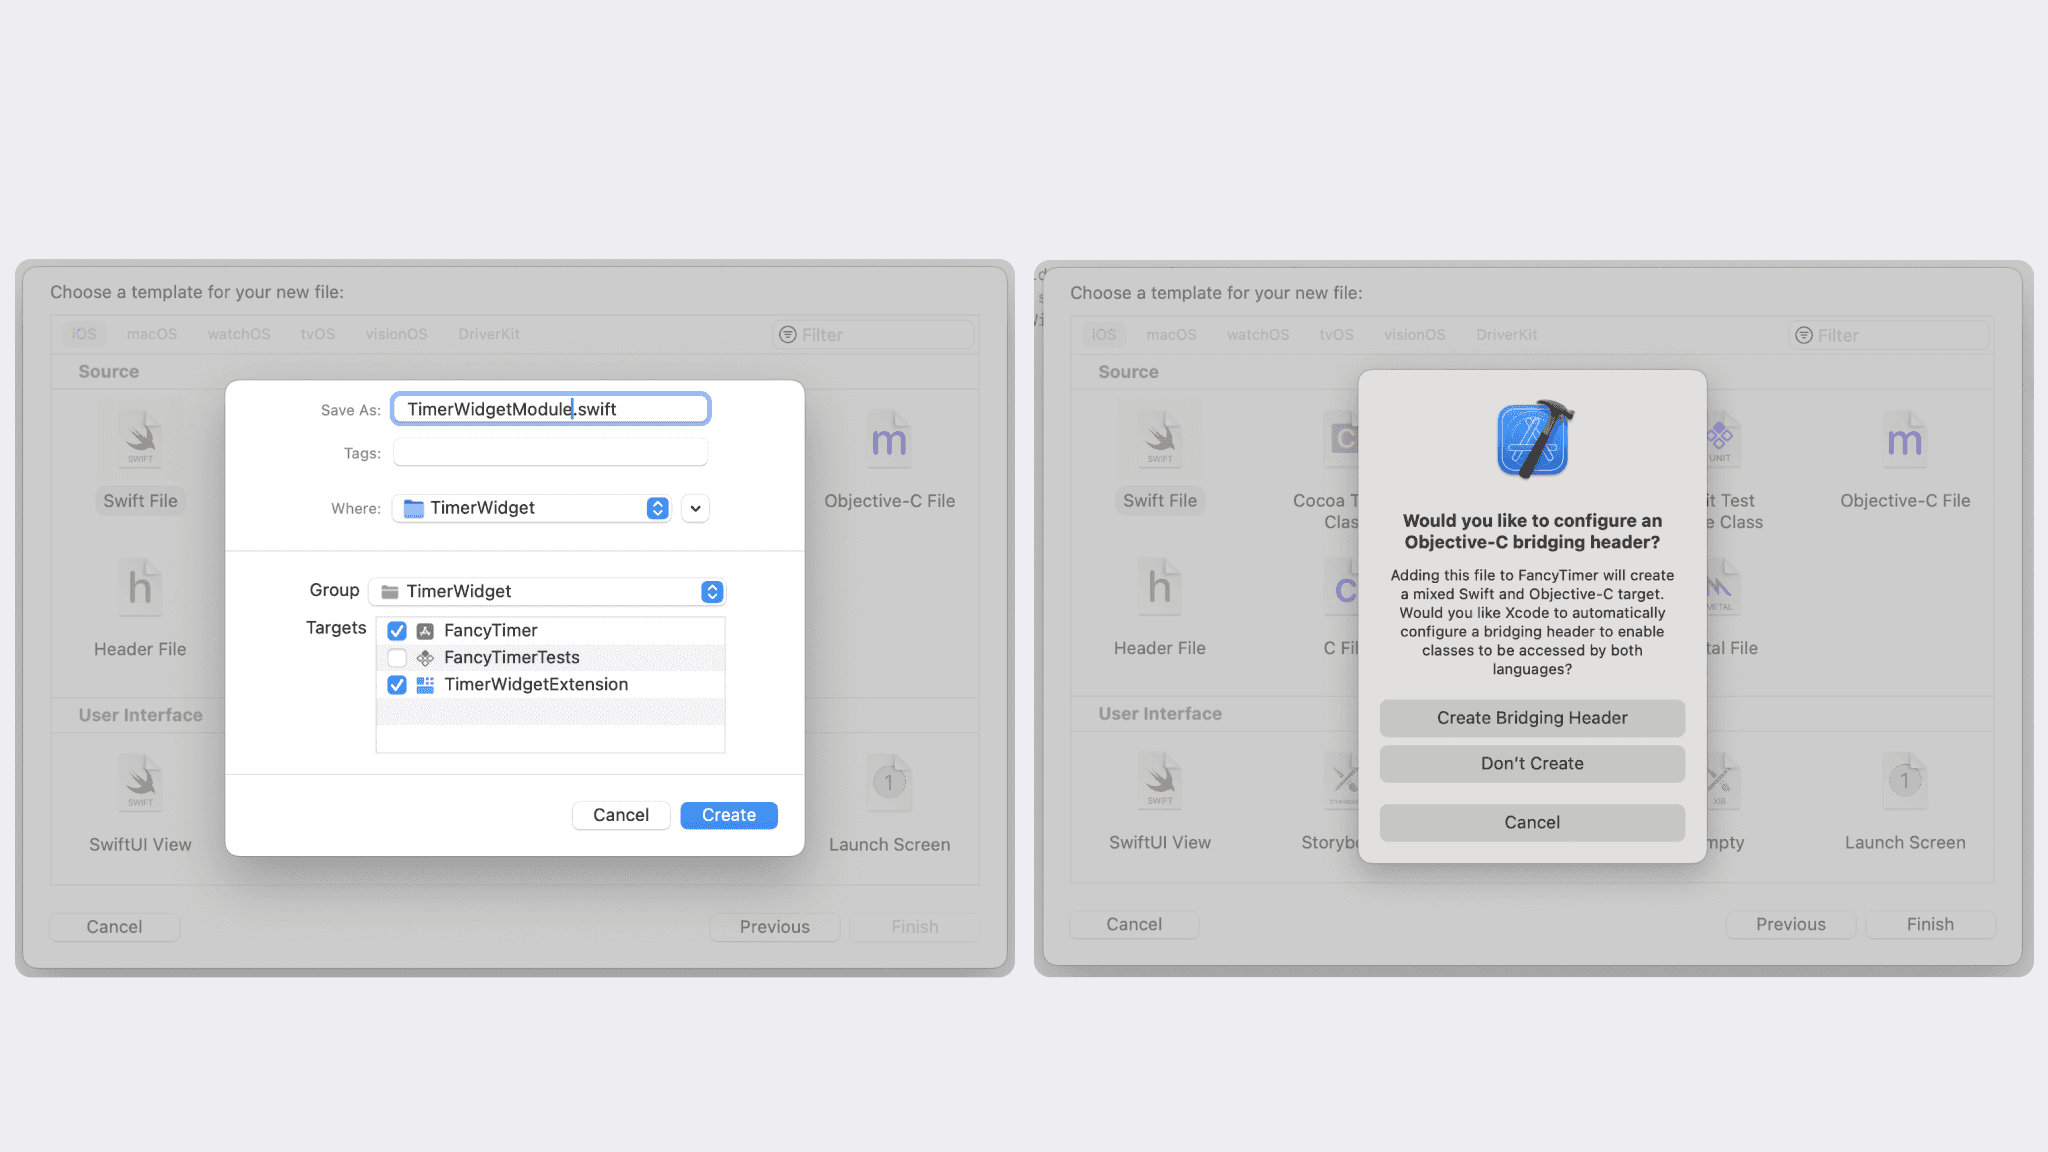
Time to get hands-on with Xcode. Open it up and create a new Swift file within the TimerWidget group, naming it TimerWidgetModule.swift.
Remember to add this file to both your application and widget extension targets.
When doing this, you might encounter a popup about configuring an Objective-C bridging header. This is just Xcode’s way of saying you'll need this if you plan to mix Swift with Objective-C code.
Since React Native uses Objective-C files to export native module methods, go ahead and select "Create Bridging Header".
Your native module will initially expose a couple of essential methods: one to kick off the live activity with the timer, and another to stop the activity.
A key point in Swift is its lack of support for macros, which brings us to the @objc modifiers.
These modifiers are crucial as they ensure your class and functions are exported correctly to the Objective-C runtime,
on which React Native depends. Using @objc(TimerWidgetModule) makes sure the module can be accessed in React Native via NativeModules.TimerWidgetModule.
Also, don't forget to have your class inherit from NSObject.
// TimerWidgetModule.swift
import Foundation
@objc(TimerWidgetModule)
class TimerWidgetModule: NSObject {
@objc
func startLiveActivity() -> Void {
// TODO implementation
}
@objc
func stopLiveActivity() -> Void {
// TODO implementation
}
}Next, let's create a private implementation file in Objective-C named TimerWidgetBridge.m to register the necessary methods with React Native.
Keep in mind, this file is specifically for React Native, so you should add it to the application target only.
// TimerWidgetBridge.m
#import <React/RCTBridgeModule.h>
@interface RCT_EXTERN_MODULE(TimerWidgetModule, NSObject)
+ (bool)requiresMainQueueSetup {
return NO;
}
RCT_EXTERN_METHOD(startLiveActivity)
RCT_EXTERN_METHOD(stopLiveActivity)
@endThe requiresMainQueueSetup method informs React Native whether your module needs to be initialized
on the main thread prior to the execution of any JavaScript code.
Since the module doesn't engage with UI elements or APIs that demand execution on the main thread (like those in UIKit),
you can safely return NO. This allows the module to initialize on a background thread, which can significantly speed up the app's startup time.
To wrap things up, locate the FancyTimer-Bridging-Header.h file that Xcode created earlier and import the RCTBridgeModule.h.
This protocol provides you with the necessary interfaces and macros. It acts as a bridge, enabling you to tap into React Native's core modules and APIs, which are primarily written in Objective-C, directly from your Swift files.
// FancyTimer-Bridging-Header.h
#import <React/RCTBridgeModule.h>Timer Live Activity Design
Time to channel your inner artist 🎨! In this next step, you're going to delve into SwiftUI to craft the interface of your Timer Live Activity.
For now, let's put aside the interactive play/pause and stop buttons in the Expanded mode. You'll circle back to these features later on.
Data Model
Let's dive first into the data model.
To describe the content of a Live Activity, you'll start by implementing the ActivityAttributes protocol.
If you recall from Part 1 of the series, you learned that any data subject to change over time should reside within the ContentState struct.
For the timer that's counting up, the only piece of information necessary for the Live Activity to work its magic is a timestamp indicating when the timer kicked off.
With that in mind, go ahead and open up the TimerWidgetLiveActivity.swift file, and let's paste in the following code at the top.
// TimerWidgetLiveActivity.swift
import ActivityKit
import WidgetKit
import SwiftUI
struct TimerWidgetAttributes: ActivityAttributes {
public struct ContentState: Codable, Hashable {
var startedAt: Date? }
}
// Widget definition
struct TimerWidgetLiveActivity: Widget {...}Widget
Now, let's jump into the exciting part where you're going to explore SwiftUI and breathe life into the design with View components.
The startedAt state variable captures the moment when you hit the start button. However, as a timer, you need a way to update the Live Activity content every second to make that timer tick up.
Intuitively, you might think about scheduling an interval in Swift to execute a block of code periodically, calculating the time elapsed since the start and formatting it into an m:ss output.
While that approach is entirely reasonable, there's a smarter option that allows you to automatically update the timer within the Live Activity without involving your Native Module.
The trick lies in using the .timer date text style to delegate the update process to the operating system clock.
Text(
Date(timeIntervalSinceNow: context.state.startedAt.timeIntervalSince1970 - Date().timeIntervalSince1970),
style: .timer
)Notice that timeIntervalSinceNow has to be negative to indicate a past date, which makes the timer count up.
Here are the benefits of letting Apple's OS handle the ticking:
- The Native Module stays lightweight, and the Widget can function independently and autonomously.
- Improved performance and synchronization when it comes to updating the timer count.
Below, you'll find a basic layout structure for the initial timer. However, I encourage you to experiment, unleash your creativity, and discover the path that aligns best with your vision and style! And don't fret if you run low on ideas for now 😉. I'll be suggesting incremental UI improvements along the way.
// TimerWidgetLiveActivity.swift
import ActivityKit
import WidgetKit
import SwiftUI
struct TimerWidgetAttributes: ActivityAttributes {
public struct ContentState: Codable, Hashable {
var startedAt: Date?
// This will be useful later on to calculate the bridge time (since the timer will be started from JS land)
func getTimeIntervalSinceNow() -> Double {
guard let startedAt = self.startedAt else {
return 0
}
return startedAt.timeIntervalSince1970 - Date().timeIntervalSince1970
}
}
}
struct TimerWidgetLiveActivity: Widget {
var body: some WidgetConfiguration {
ActivityConfiguration(for: TimerWidgetAttributes.self) { context in
// Lock screen/banner UI goes here
VStack {
Text(
Date(timeIntervalSinceNow: context.state.getTimeIntervalSinceNow()),
style: .timer
)
.font(.title)
.fontWeight(.medium)
.monospacedDigit()
}
.activityBackgroundTint(Color.cyan)
.activitySystemActionForegroundColor(Color.black)
} dynamicIsland: { context in
DynamicIsland {
// Expanded Region
DynamicIslandExpandedRegion(.center) {
Text(
Date(timeIntervalSinceNow: context.state.getTimeIntervalSinceNow()),
style: .timer
)
.font(.title)
.foregroundColor(.cyan)
.fontWeight(.medium)
.monospacedDigit()
}
} compactLeading: {
Image(systemName: "timer")
.imageScale(.medium)
.foregroundColor(.cyan)
} compactTrailing: {
Text(
Date(timeIntervalSinceNow: context.state.getTimeIntervalSinceNow()),
style: .timer
)
.foregroundColor(.cyan)
.frame(maxWidth: 32)
.monospacedDigit()
} minimal: {
Image(systemName: "timer")
.imageScale(.medium)
.foregroundColor(.cyan)
}
.widgetURL(URL(string: "http://www.apple.com"))
.keylineTint(Color.red)
}
}
}To keep things simple, I'm using one of the system icons. I recommend downloading the SF Symbols desktop application to explore the entire catalog. This tool lets you search by keywords and easily discover the associated system name of the icon you wish to use.
It's worth mentioning that this code introduces a handful of view modifiers. For instance,font, foregroundColor, and monospacedDigit,
are utilized to tweak the appearance of the timer Text.
View modifiers, particularly in the context of SwiftUI, do not mutate the existing view instance. Instead, they return a new view instance that incorporates the modifications. That's due to SwiftUI's design being inherently declarative.
Preview Your Changes
To streamline your development process, I've prepared some handy code snippets for you. These snippets will allow you to preview your changes directly in Xcode's preview pane, eliminating the need to launch the app.
Simply copy and paste the code provided below, and you'll be able to witness your updates in real-time.
// TimerWidgetLiveActivity.swift
import ActivityKit
import WidgetKit
import SwiftUI
// Your previously defined TimerWidgetAttributes
struct TimerWidgetAttributes: ActivityAttributes {...}
// Your previously defined TimerWidgetLiveActivity
struct TimerWidgetLiveActivity: Widget {...}
// Copy the below at the end of your file
extension TimerWidgetAttributes {
fileprivate static var preview: TimerWidgetAttributes {
TimerWidgetAttributes()
}
}
extension TimerWidgetAttributes.ContentState {
fileprivate static var initState: TimerWidgetAttributes.ContentState {
TimerWidgetAttributes.ContentState(startedAt: Date())
}
}
#Preview("Notification", as: .content, using: TimerWidgetAttributes.preview) {
TimerWidgetLiveActivity()
} contentStates: {
TimerWidgetAttributes.ContentState.initState
}If you've followed the steps correctly, your simulator preview should now be displaying 0:00.
Feeling a bit lost? No worries at all! Simply clone the complementary repository
and check out the step/preview_timer_design branch to align with this particular step.
Module Implementation
Up to this point, the Native Module file you've created in Swift has only defined the methods. Now, it's time to flesh out the implementation, enabling interaction with the live activity directly from the code.
Go ahead and open your TimerWidgetModule.swift file in Xcode. The below snippet uses the ActivityKit framework to control iOS Live Activities.
// TimerWidgetModule.swift
import Foundation
import ActivityKit
@objc(TimerWidgetModule)
class TimerWidgetModule: NSObject {
private func areActivitiesEnabled() -> Bool {
return ActivityAuthorizationInfo().areActivitiesEnabled
}
@objc
func startLiveActivity() -> Void {
if (!areActivitiesEnabled()) {
// User disabled Live Activities for the app, nothing to do
return
}
// Preparing data for the Live Activity
let activityAttributes = TimerWidgetAttributes()
let contentState = TimerWidgetAttributes.ContentState(startedAt: Date())
let activityContent = ActivityContent(state: contentState, staleDate: nil)
do {
// Request to start a new Live Activity with the content defined above
try Activity.request(attributes: activityAttributes, content: activityContent)
} catch {
// Handle errors, skipped for simplicity
}
}
@objc
func stopLiveActivity() -> Void {
// A task is a unit of work that can run concurrently in a lightweight thread, managed by the Swift runtime
// It helps to avoid blocking the main thread
Task {
for activity in Activity<TimerWidgetAttributes>.activities {
await activity.end(nil, dismissalPolicy: .immediate)
}
}
}
}
Let's unpack the critical elements and ideas in the code, along with the annotations provided in the snippet:
- Checking for User Settings: Since users have the option to manually disable Live Activities in the app's settings,
it's crucial to verify this setting before initiating the Live Activity. That's done via the
areActivitiesEnabledfunction. - Starting the Live Activity (
startLiveActivity): This method, which is accessible to React Native, readies the attributes and content state for the Live Activity. It then tries to launch it usingActivity.request. The process is encapsulated in ado-catchblock, essential for handling potential errors and keeping the Swift compiler happy. - Stopping the Live Activity (
stopLiveActivity): This method is also available to React Native. It employs aTaskto execute code concurrently, ensuring the main thread isn't blocked. The method iterates over all activities of theTimerWidgetAttributestype and terminates them immediately. Theawaitkeyword is necessary here becauseactivity.endis an asynchronous operation.
Great job! You're now another step closer to having a fully functional end-to-end system. Just two more steps to go: enabling live activities and crafting some basic React Native UI to interact with the methods you've just made available.
Enable Live Activities for Your Application
To prepare your app for showcasing live activities, a key step is to modify the Info.plist file of your application
(note: this is not the Widget Extension's Info.plist). You need to add the "Supports Live Activities" entry and set its Boolean value to YES.
Alternately, if you prefer to operate directly in the source code:
- In your project, right-click on the
Info.plistfile. - Choose "Open As" and then select "Source Code".
- Insert the
NSSupportsLiveActivitieskey into the file as shown below:
<key>NSSupportsLiveActivities</key>
<true/>TypeScript
Now, to bring your initial system iteration full circle and test the Timer Native Module, let's turn to the App.tsx file
in your React Native project.
You'll create a couple of straightforward buttons here. When clicked, they will invoke a specific method from the native module.
// App.tsx
import React from "react";
import { Button, SafeAreaView, NativeModules, View } from "react-native";
const { TimerWidgetModule } = NativeModules;
function App(): React.JSX.Element {
return (
<SafeAreaView style={{ flex: 1, justifyContent: "center" }}>
<View
style={{
flexDirection: "row",
justifyContent: "space-between",
paddingHorizontal: 48,
}}
>
<Button
title="Start Timer"
onPress={() => {
TimerWidgetModule.startLiveActivity();
}}
/>
<Button
title="Stop Timer"
onPress={() => {
TimerWidgetModule.stopLiveActivity();
}}
/>
</View>
</SafeAreaView>
);
}
export default App;Alrighty, it's time to fire up your Metro packager, summon your courage, and hit that "Play" button in Xcode. Then, kick back, grab some popcorn, and cross your fingers for a successful build.
Once you see the app appearing on the screen, hitting "Start Timer" should bring a smile to your face. Watch how the timer in the Dynamic Island section ticks up like clockwork.
Encountered unexpected issues? Don't panic! I'm here to help. Simply clone the example repo
and switch to the step/basic_system_e2e branch to get to this exact point.
App Screen Design
Now that everything's up and running smoothly, lets spicy up the main application screen and showcase a counter as well.
I'm going to streamline the counter's state management using a custom hook I'll call useTimer.
This hook will provide you with a formatted string in the mm:ss format, along with a couple of methods to kickstart or pause the timer.
Below, you'll find the implementation:
// useTimer.ts
import React from "react";
import { NativeModules } from "react-native";
const { TimerWidgetModule } = NativeModules;
const useTimer = () => {
const [elapsedTimeInMs, setElapsedTimeInMs] = React.useState(0);
const startTime = React.useRef<number | null>(null);
const intervalId = React.useRef<NodeJS.Timeout | null>(null);
const elapsedTimeInSeconds = Math.floor(elapsedTimeInMs / 1000);
const secondUnits = elapsedTimeInSeconds % 10;
const secondTens = Math.floor(elapsedTimeInSeconds / 10) % 6;
const minutes = Math.floor(elapsedTimeInSeconds / 60);
const value = `${minutes}:${secondTens}${secondUnits}`;
function play() {
// Already playing, returning early
if (intervalId.current) {
return;
}
// First time playing, recording the start time
if (!startTime.current) {
startTime.current = Date.now();
}
TimerWidgetModule.startLiveActivity();
intervalId.current = setInterval(() => {
setElapsedTimeInMs(Date.now() - startTime.current!);
}, 1000);
}
function reset() {
removeInterval();
startTime.current = null;
setElapsedTimeInMs(0);
TimerWidgetModule.stopLiveActivity();
}
function removeInterval() {
if (intervalId.current) {
clearInterval(intervalId.current);
intervalId.current = null;
}
}
return {
play,
reset,
value,
};
};
export default useTimer;Now, let's tweak the App.tsx file to import the custom useTimer hook and connect the variables that it exports.
// App.tsx
import React from "react";
import { Button, SafeAreaView, Text, View } from "react-native";
import useTimer from "./useTimer.ts";
function App(): React.JSX.Element {
const { value, reset, play } = useTimer(); return (
<SafeAreaView
style={{ flex: 1, justifyContent: "center", alignItems: "center" }}
>
<View style={{ paddingVertical: 32 }}>
<Text style={{ fontSize: 80, fontVariant: ["tabular-nums"] }}>
{value} </Text>
</View>
<View
style={{
flexDirection: "row",
justifyContent: "space-between",
paddingHorizontal: 48,
}}
>
<View style={{ marginRight: 32 }}>
<Button title="Start" onPress={play} /> </View>
<Button title="Stop" onPress={reset} /> </View>
</SafeAreaView>
);
}
export default App;Your application is now rocking a sleek timer that counts up every second as well, so no matter whether you are inside the app or not, you won't miss the count!
If you want to delve deeper and see how all the pieces fit together up to this point, don't hesitate to dive into the
step/app_timer_basic branch of this repository.
It's the perfect way to compare everything you've accomplished thus far.
Conclusion
If you've made it this far, kudos to you! You're now one step closer to mastering iOS Live Activities.
I'll leave you with a small exercise to prepare you for the next bits to come.
Remember the TimerWidgetAttributes struct at the top of your TimerWidgetLiveActivity file? It's expecting a startedAt value as a state.
Your mission is to make the necessary changes to the project so that the startLiveActivity method from your Native Module can receive that date value from JS.
Take as much time as you need; I'll be here waiting when you're ready. 😃
In any case, no matter if you've nailed it or are eager to see the solution, get ready for part 3 of this series, the grand finale! This thrilling piece ties together all the outstanding features of the timer, elevating it to its full glory. I'm talking about:
- Launching a slick pause/resume feature in the app.
- Amping up the design for Dynamic Island Expanded and Lock screen modes to dazzle your users.
- Bringing in the ability to pause and stop the action right from the live activity itself.
Until then, happy coding!️️ ❤️

