

Introduction
Hey there, welcome to the kickoff of an epic series! 🚀
Ever heard of iOS Live Activities? If you're nodding, you already know their awesomeness. But if this is your first encounter, buckle up! By the end of this article, you'll be so thrilled, you might just call your parents to gush about it.
This first article's mission? To offer you a red pill - an invitation to shift from simply being a "React Native Developer" to embracing the broader mantle of a "Mobile Engineer."
Throughout this series, I'm going to guide you through the fascinating world of native modules and all those nifty tricks that blend React Native with the latest and greatest iOS features seamlessly.
So, grab your cup of warm coffee, and let's dive in!
Live Activities
iOS Live Activities introduces a game-changing approach to real-time updates, significantly enhancing user interaction beyond the capabilities of traditional push notifications.
First introduced in iOS 16.1 and iPadOS 17, Live Activities integrate seamlessly with the Lock Screen on iPhones, StandBy mode, and the innovative Dynamic Island. They provide continuous, live updates directly on the screen, eliminating the need to constantly open the app.
In contrast to the ephemeral and sometimes disruptive nature of push notifications, Live Activities offer a more engaging and less intrusive experience. Users can quickly glance at specific OS-level locations to stay updated with the latest information without the hassle of unlocking their devices or shuffling through multiple apps.
But first, let's set the stage. Apple released a fantastic video that illustrates the vast possibilities Live Activities offer. And, as they say, a video speaks a thousand words. If you can spare 15 minutes of your time go watch it. Trust me, you won't regret it.
Widgets vs Live Activities
With the advent of iOS 14, Widgets made their debut.
While Live Activities are centered around delivering real-time updates, Widgets cater to a different need, being more static by nature.
The primary distinction lies in their dynamic nature. Live Activities embody the concept of 'live', keeping users updated moment-to-moment. They're ideal for tracking events as they unfold – be it a sports match, the estimated time of arrival of your Uber driver, or the journey of your food delivery.
On the other hand, Widgets present a broader overview, perfectly suited for less time-sensitive content like weather updates or calendar events.
Lock Screen, Stand By, and Dynamic Island, you ask?
If you skipped the video, let's quickly clarify some terms, accompanied by visuals. These are essentially the areas or presentation modes where Live Activities can be displayed.
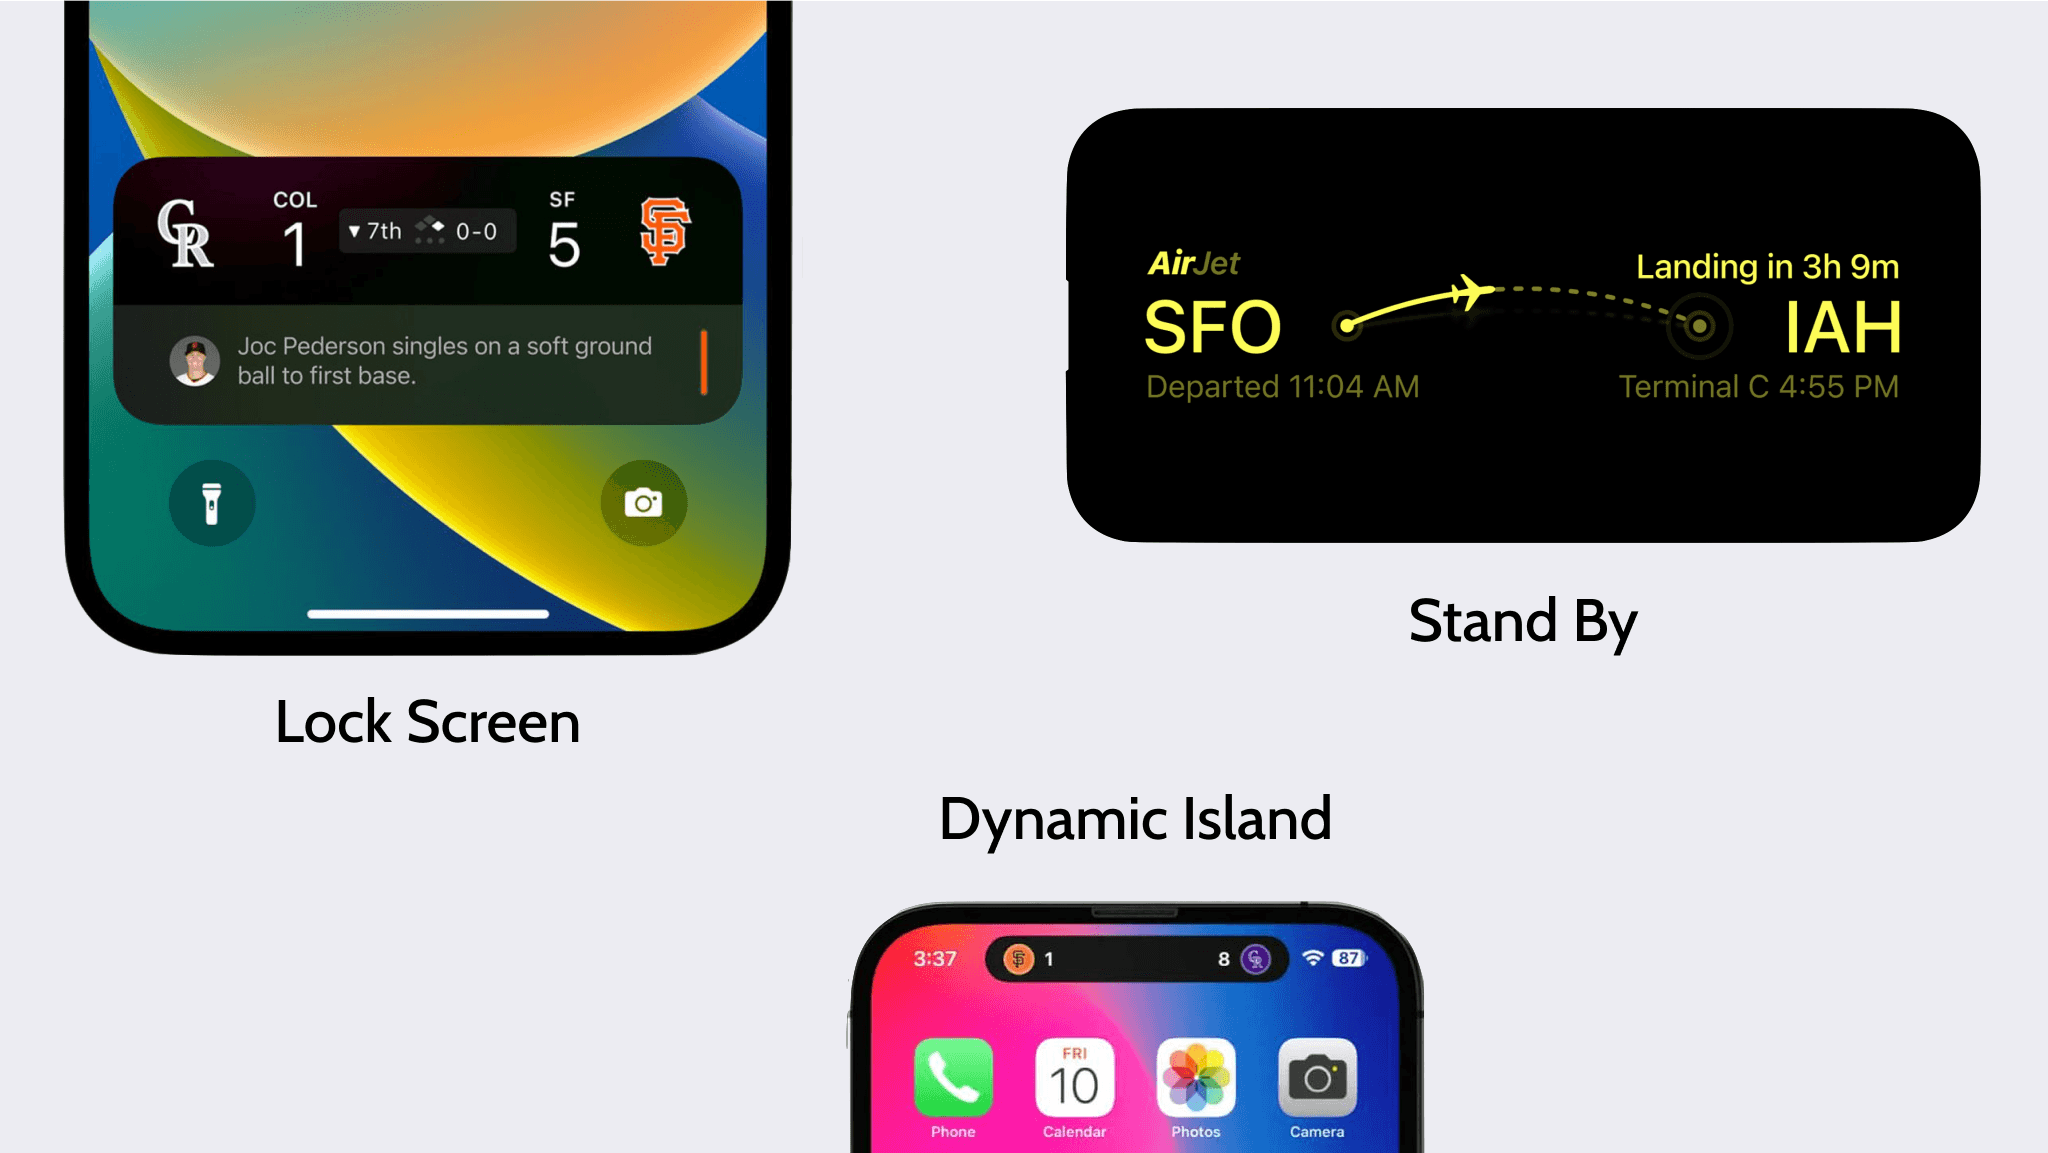
Lock Screen
The Lock Screen is the first interface you encounter upon waking your iPhone. It's the portal to your device, showcasing the time, notifications, and now, thanks to Live Activities, real-time updates. It offers essential information without the need to unlock your phone.
StandBy
StandBy, a feature introduced in iOS 17, transforms your iPhone into a multipurpose display. When your phone is charging, it can serve as a bedside clock, a digital photo frame, or a full-screen viewport for Live Activities.
Dynamic Island
Unveiled with the iPhone 14 Pro models, Dynamic Island is a unique feature at the top of the screen that ingeniously integrates notifications, alerts, and Live Activities. This innovative design allows users to engage with live updates seamlessly, without disrupting the view of the rest of the screen.
Building Your First Live Activity
Time to step out of your cozy React Native comfort zone and face down a tool you probably wished never existed. Thought you could whip up Live Activities with just JavaScript/TypeScript? Time to think again.
Scaffolding a Widget Extension
Still here? Awesome, let's roll.
First, let's kick off a new bare React Native project. Fire up your terminal and run: npx react-native@latest init FancyTimer.
When prompted "Do you want to install CocoaPods now?" hit yes.
Now, open up Xcode. Thankfully, it's got some handy templates for common components/patterns. To craft a Live Activity, you need to create a Widget Extension. Think of Live Activities as subclasses of Widgets — they share heaps in both practice and code. Here's what you need to do:
-
Open your app project in Xcode and head to File > New > Target.
-
In the Application Extension group, pick Widget Extension, then hit Next.
-
Time to name your extension. Let's go with
TimerWidget. This is a hint at what you'll be building during this series 👀 -
Don’t forget to check the "Include Live Activity" box. For now, you can skip the "Include Configuration App Intent".
-
Hit Finish.
-
A pop-up might ask about "Activating TimerWidgetExtension scheme?" for the target. Go ahead and click "Activate".
The screenshot below shows the steps you've just followed and the file structure you should end up with.

What is an iOS Target?
Before diving further, let's unpack what an iOS target is, clarifying some of the terms used throughout this article.
In the realm of iOS development, a target is essentially a set of configurations and files that dictate how a specific version or component of your app is built. This includes crucial details like which files to compile, linking methods, included resources, and other key configurations.
Think of targets as independent, self-contained products within your project.
A typical target includes:
- Source files: These could be Swift, Objective-C, C/C++ files, among others.
- Resource files: This category covers images, localization files, and similar resources.
- Frameworks and libraries: These are the external or internal libraries your project uses.
- Build settings: These settings encompass compiler flags, SDK versions, optimization levels, and more.
- Info.plist: A configuration file containing essential key-value pairs such as bundle identifier, version number, permissions, etc.
As for the types of targets, here are the most common ones:
- Application targets: These are for building the actual iOS app. In your case, it's the
FancyTimertarget, which is created by default. - Test targets: Used for testing your application, like the
FancyTimerTesttarget, also set up by default. - Framework or library targets: These are for reusable code components. Examples include
SwiftUIandWidgetKitframeworks, both vital for building Live Activities. - Extension targets: These are for app extensions like widgets or watchOS apps, just like the one you've just created!
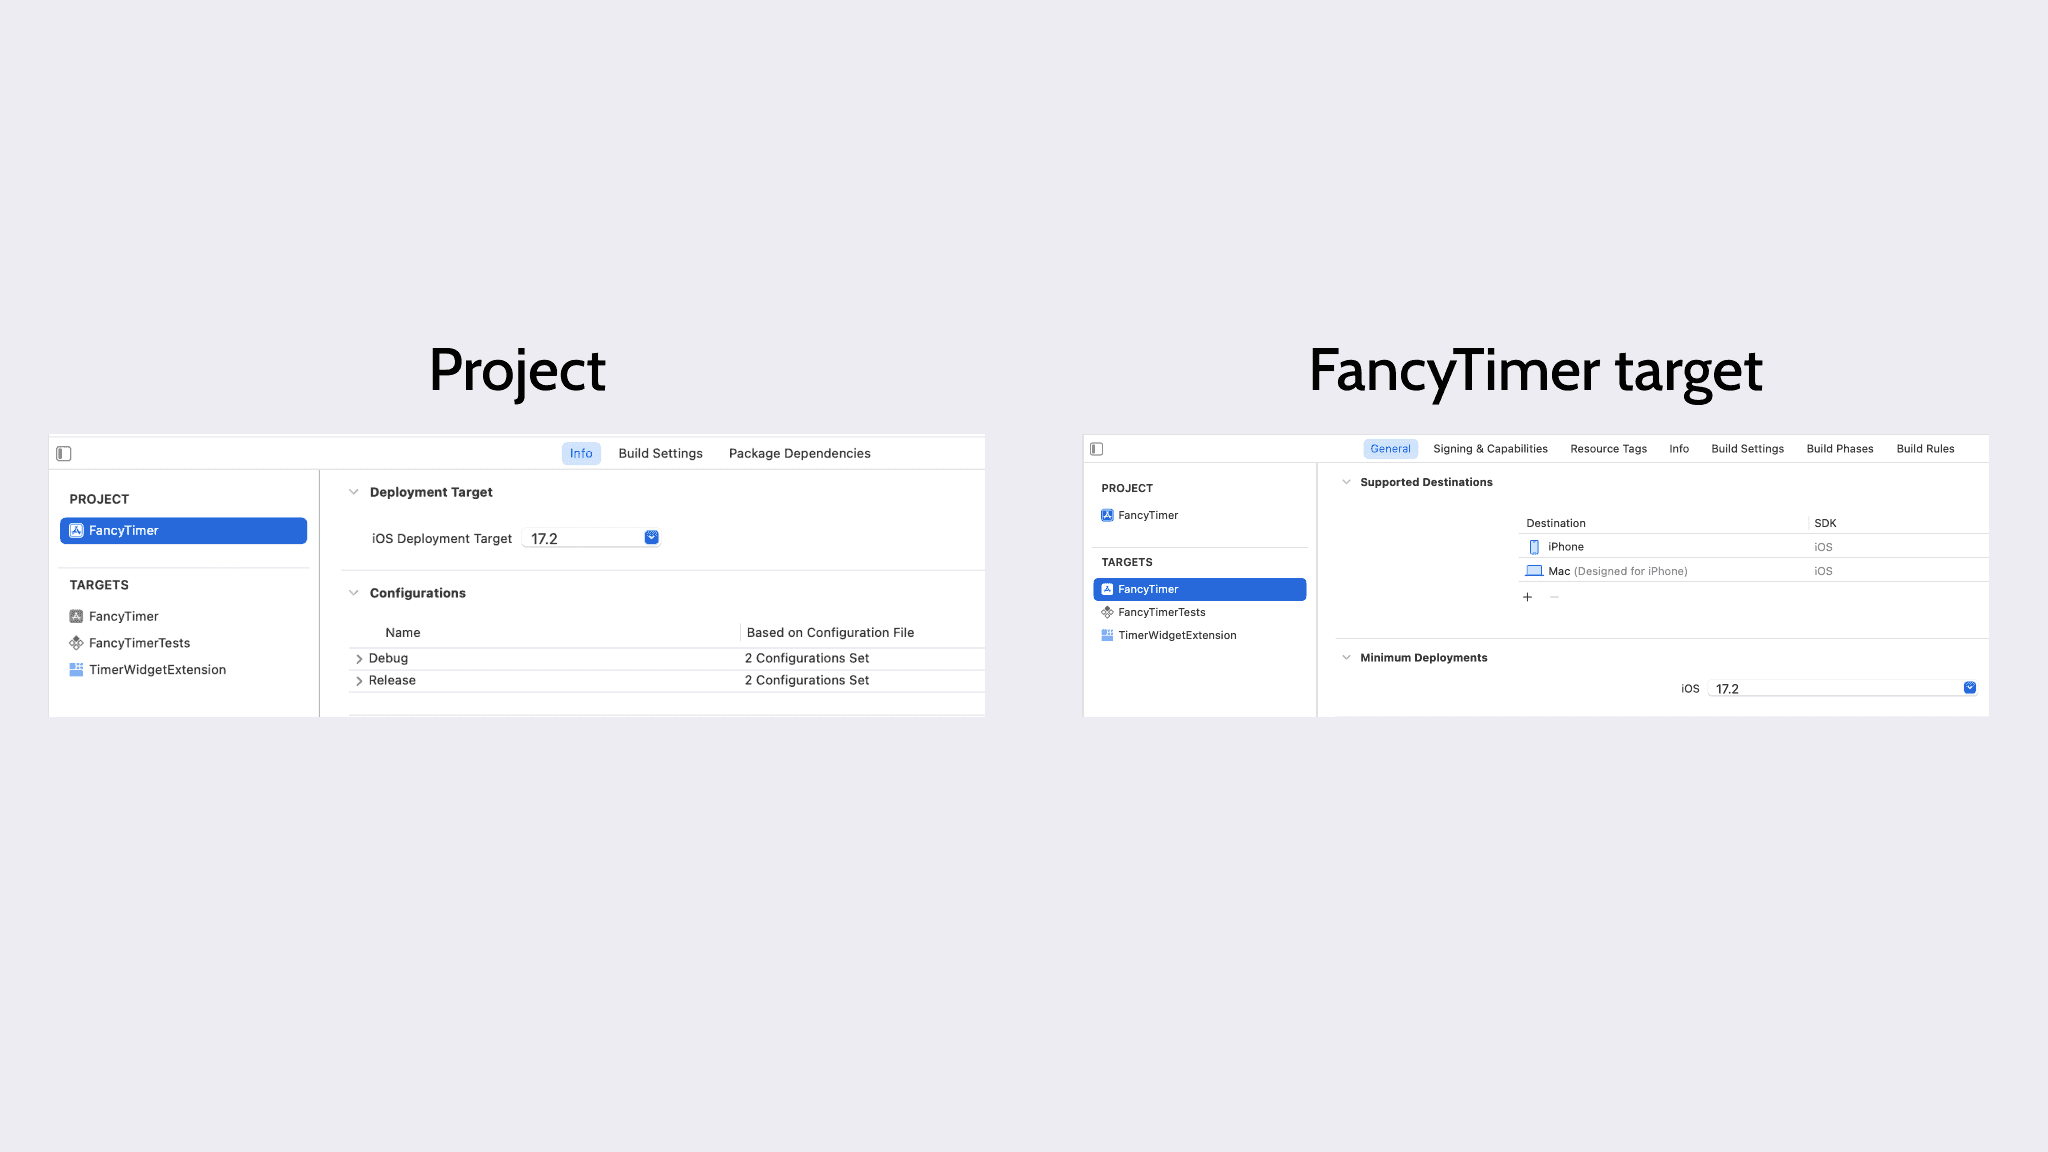
Change the Deployment Target to iOS 17.2
In its latest version, 0.73, React Native sets the iOS deployment target to 13.4 by default for new projects.
To simplify your development process, it's a good idea to set the iOS deployment target to the latest version for both the Project and the FancyTimer target.
This step is important because Live Activities were introduced in iOS 16.1, and their interactivity (including buttons and toggles) was further incorporated in iOS 17.
While there's a method to execute code on specific platforms or OS versions using conditional compilation markers, that topic is outside the scope for now.
Enable Live Activities for Your Application
To get your app ready for showcasing live activities, you'll need to tweak your Info.plist file.
Specifically, you have to add the "Supports Live Activities" entry and set its Boolean value to YES.
If you're like me and prefer getting your hands dirty with source code, here's a quick way to do it:
- Right-click on the
Info.plistfile in your project. - Select "Open As" and then choose "Source Code".
- Add the following
NSSupportsLiveActivitieskey into the file:
<key>NSSupportsLiveActivities</key>
<true/>Anatomy of a Widget Extension
If you're keen on understanding what you're coding (just like I am), I'll gladly walk you through it. This is a fantastic chance to get hands-on with the Swift programming language, building something awesome along the way! Learning by doing is definitely my mantra.
However, if you, dear reader, are already a Swift maestro, feel free to skip ahead to the Deleting the Default Widget section.
Swift
Swift is a multi-paradigm, compiled programming language developed by Apple for iOS, macOS, watchOS, tvOS, and Linux development. It incorporates features from object-oriented, functional, and protocol-oriented programming, making it a versatile and modern language.
Some of its key features are:
- Safety: Swift emphasizes safety with strong typing and error handling.
- Performance: It's optimized for performance and built using the LLVM compiler framework.
- Modern Syntax: Swift has a clean and expressive syntax that makes the code easy to read and write.
- Interoperability: It seamlessly works with existing Objective-C code and libraries.
- Memory Management: Automatic Reference Counting (ARC) for efficient memory management without the need for manual code.
- Functional Programming Features: It supports functional programming patterns like map and filter.
- Open Source: Swift is open-source, allowing the community to contribute to its development.
Swift UI Concepts
At the core of your Widget Extension lies the TimerWidgetBundle.swift file, serving as the entry point.
Assuming you're not very familiar with Swift, let's take a moment to demystify its syntax.
import WidgetKit
import SwiftUI
@main
struct TimerWidgetBundle: WidgetBundle {
var body: some Widget {
TimerWidget()
TimerWidgetLiveActivity()
}
}- At the top, the file imports 2 frameworks,
WidgetKitandSwiftUI. WidgetKit provides the tools to create, configure, and display your app's widgets and live activities. SwiftUI is Apple's framework for creating user interfaces with a declarative Swift syntax, a natural fit for widgets. - The
@mainannotation is a special Swift attribute that identifies the entry point of the program. In this case, it's indicating thatTimerWidgetBundleis the main entry point for the Widget Extension Target. struct TimerWidgetBundle: here, a struct namedTimerWidgetBundleis defined. A struct in Swift is a building block of your program. Contrary to C structs that are limited to storing data, Swift structs can also have methods, functions and initializers. They are in fact pretty similar to classes, but with some differences, like not supporting inheritance.WidgetBundleis a protocol that defines the requirements for a widget bundle, which is a collection of widgets and live activities. It's used to group related widgets and live activities together.struct TimerWidgetBundle: WidgetBundle: putting it all together, this line describes thatTimerWidgetBundlebehaves like aWidgetBundle. This is protocol-oriented programming in action, where a type can conform to multiple protocols to describe its functionality. This is one of the functional programming features of Swift.- If
TimerWidgetBundlebehaves like aWidgetBundle, that essentially means it has to have a property calledbodyin its struct, as described by the protocol. var body: some Widget: This is the declaration of the body property, which is required by theWidgetBundle protocol. The keywordsomeis probably drawing your attention. You may be used to variable declarations likevar i: Intorvar s: String, so what's its deal?someis used to indicate that it's returning some type that conforms to theWidgetprotocol, without specifying exactly what type. This is known as an opaque type in Swift, allowing for flexibility while still maintaining strong type safety.- The curly braces after
some Widget {}are used to define a computed property. This means the value of the property is computed on the fly, rather than being stored in memory. A JavaScript equivalent would be a IIFE (Immediately Invoked Function Expression). TimerWidget()andTimerWidgetLiveActivity()are structs that conform to theWidgetprotocol. They are the widgets and live activities that are part of the Widget Extension.
Deleting the Default Widget
Alright, that was a hefty dose of Swift for starters! Let's now tidy up our project a bit.
When you create a Widget Extension, Xcode helpfully generates a basic Widget file for you. But since our focus is solely on building a Live Activity, you can now:
- Delete the
TimerWidget.swiftfile: Simply right-click on it and move it to the trash. - Update the
TimerWidgetBundle.swiftfile: Open it up and remove theTimerWidget()line.
With these quick steps, you'll have a cleaner project setup, tailored specifically for Live Activities.
Anatomy of a Live Activity
Now, let's delve into the core of Live Activities and understand their setup.
The TimerWidgetLiveActivity.swift file, automatically generated by Xcode, provides a basic example to get you started.
When you open this file, you'll notice that Xcode conveniently splits the content into two panes: one for your code and another for a live preview.
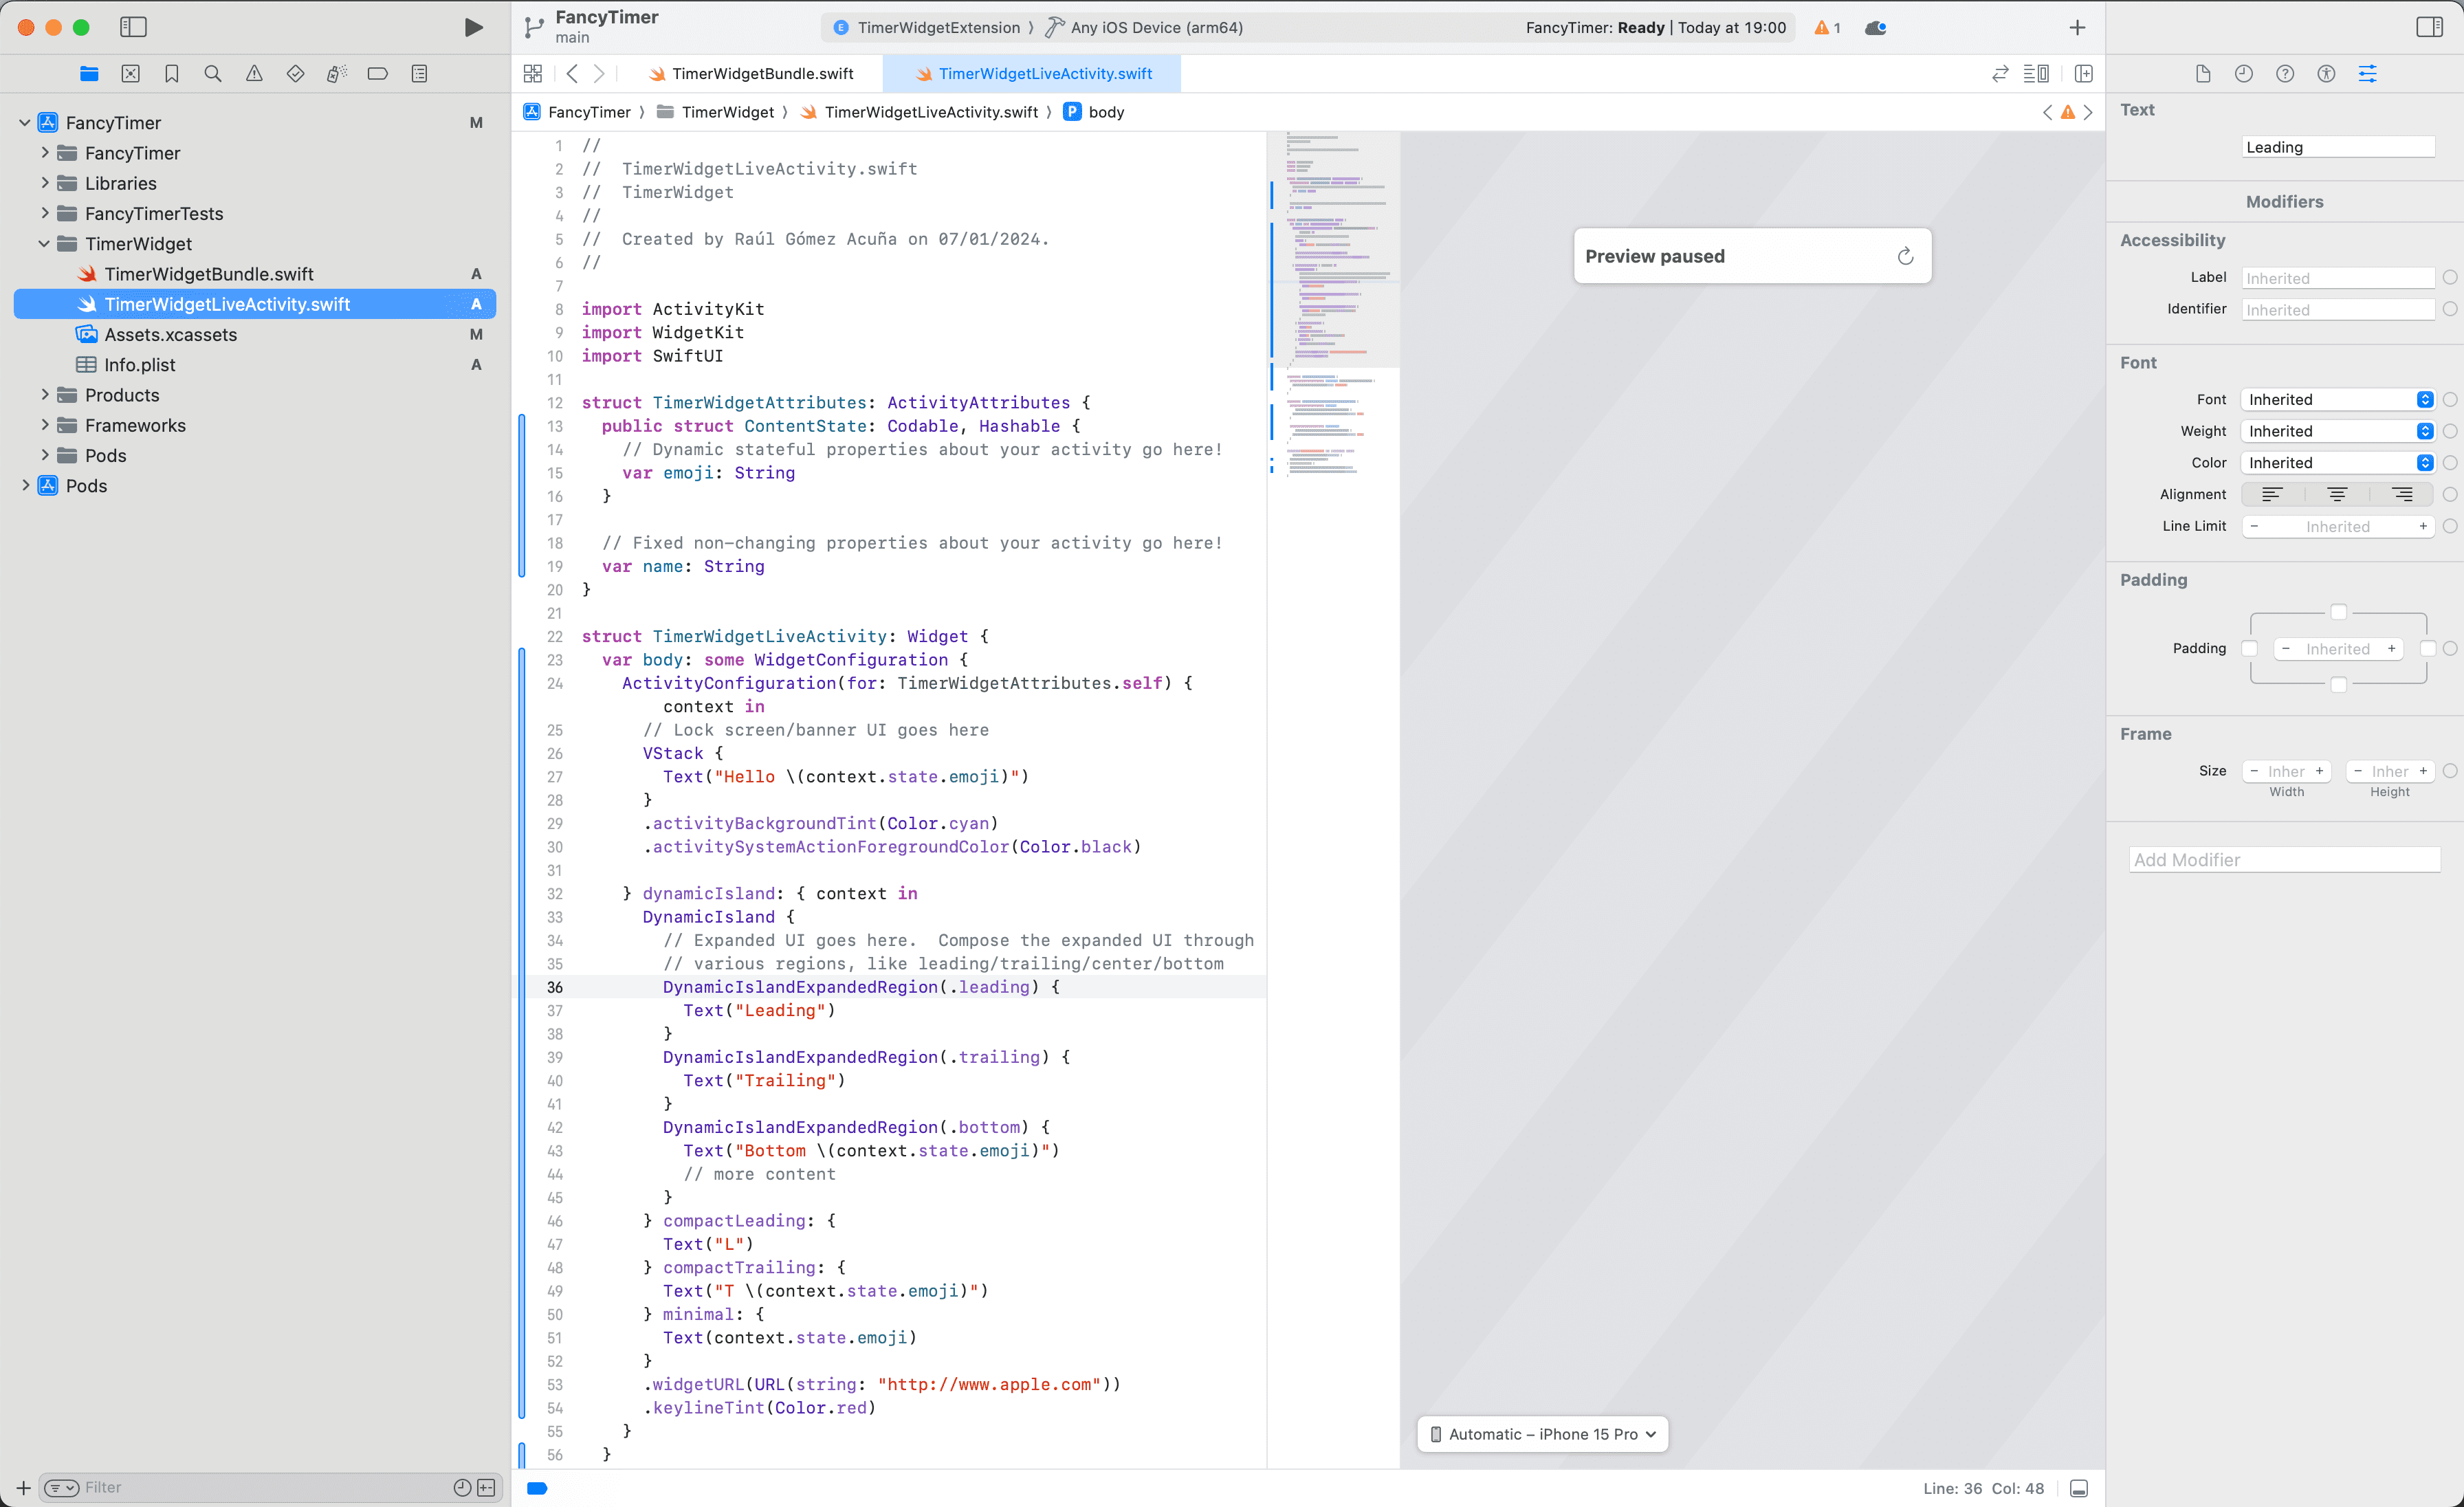
This preview feature is a gift, courtesy of a SwiftUI Macro, allowing you to visualize a live preview of specific UI elements without needing to run the entire simulator.
It's a nod towards the React Native fast-refresh experience. Although still in its early stages and somewhat slower, it's invaluable for rapidly iterating on a Live Activity UI.
That canvas is driven by the #Preview directive at the bottom of your file.
Give it a try – comment it out and watch the preview pane vanish.
Data Model
Activity Attributes are the backbone of your Live Activity, defining both the static and dynamic data that shape the Live Activity's view.
To set this up, you'll create a struct conforming to the ActivityAttributes protocol.
struct TimerWidgetAttributes: ActivityAttributes {
public struct ContentState: Codable, Hashable {
// Dynamic stateful properties about your activity go here!
var emoji: String
}
// Fixed non-changing properties about your activity go here!
var name: String
}This protocol requires an internal struct, named ContentState, designed to encapsulate data that changes over time within your live activity.
Think of it as the dynamic state of the Live Activity, akin to using state in React components.
Properties defined at the top level of the TimerWidgetAttributes struct, on the other hand, are seen as fixed data or configuration values, like name in this case.
Layout and View Layer
To craft the layout and view layer of your Live Activity, you'll need to define a struct that adheres to the Widget protocol.
struct TimerWidgetLiveActivity: Widget {
var body: some WidgetConfiguration {
ActivityConfiguration(for: TimerWidgetAttributes.self) { context in
// Lock screen/banner UI goes here
VStack {
Text("Hello \(context.state.emoji)")
}
.activityBackgroundTint(Color.cyan)
.activitySystemActionForegroundColor(Color.black)
} dynamicIsland: { context in
DynamicIsland {
// Expanded UI goes here. Compose the expanded UI through
// various regions, like leading/trailing/center/bottom
DynamicIslandExpandedRegion(.leading) {
Text("Leading")
}
DynamicIslandExpandedRegion(.trailing) {
Text("Trailing")
}
DynamicIslandExpandedRegion(.bottom) {
Text("Bottom \(context.state.emoji)")
// more content
}
} compactLeading: {
Text("L")
} compactTrailing: {
Text("T \(context.state.emoji)")
} minimal: {
Text(context.state.emoji)
}
.widgetURL(URL(string: "http://www.apple.com"))
.keylineTint(Color.red)
}
}
}The essence of the widget – its content and behavior – is encapsulated in the body computed property.
This property returns a type that conforms to WidgetConfiguration.
Now, there is a bunch of new Swift syntax here, so let's unpack the details.
Creating instances of structs
In SwiftUI, you'll be dealing with a lot of structs. In fact, classes are rare.
For instance, when you see ActivityConfiguration(for: TimerWidgetAttributes.self), you are creating an instance of the ActivityConfiguration struct,
andText("Hello \(context.state.emoji)")is creating an instance of the Text struct.
The subtle difference is that ActivityConfiguration uses a named parameter, for, to specify the type of the data model,
while Text doesn't have an outward-facing label for its text content.
The rule of thumb is to use named parameters when it's not clear what the parameter represents, and unnamed parameters when it's obvious.
VStack
Ok, you've probably noticed the VStack view in the ActivityConfiguration block. And that clearly doesn't have parentheses like a function call.
Well, VStack is also a struct, so how is the instance created?
VStack {
Text("Hello \(context.state.emoji)")
}It turns out that Swift also allows for default parameters in structs, and omitting parenthesis is a shorthand for creating an instance with default parameters. In other words, the below code is equivalent to the above:
VStack() {
Text("Hello \(context.state.emoji)")
}One mystery solved! 🕵️♂️ But wait, what about the curly braces around the VStack? That's actually a function passed as an argument, also known as a
Swift Closure.
Get used to them, because you'll see a lot of this in SwiftUI.
The curly braces is yet again another special syntax in Swift, called a trailing closure. As a matter of fact, the below code would be equivalent for the compiler:
VStack(content: {
Text("Hello \(context.state.emoji)")
})Trailing Closures
A trailing closure is a syntax feature that allows you to pass a closure (an anonymous function or a block of code) as the last argument to a function in a more readable way.
Here's the general idea: when you call a function that takes a closure as its final parameter, instead of passing the closure as part of the function call, you can write it after the function call's parentheses. This makes the function call cleaner and the code that comprises the closure's body more distinguishable as a discrete block of code.
View Builders
But wait, there's more! What's happening inside the function? It seems to be listing a list of views, doesn't it?
That's indeed correct! SwiftUI uses a DSL (Domain Specific Language) to define views, and the VStack struct is designed to accept a list of views as its content.
Behind the scenes, the content of the function is itself a @ViewBuilder, which allows you to provide multiple child views to the VStack, like:
VStack {
Text("Hello \(context.state.emoji)")
Image(systemName: "star")
}Those special functions that accept a list of views should adhere to a few constraints. In particular, they can only:
- List Views: Accept a list of views as their content
- Use conditional statements: Like
ifandswitchto conditionally include views - Use Local Variables
Anything else is forbidden, and if you attempt to do something else, the compiler will throw an error.
Another intense dose of Swift out of the way, Let's keep going!
Dynamic Island
Let's take a closer look at ActivityConfiguration. The init method of this struct takes three arguments:
for: This named parameter specifies the type describing your Live Activity's content, in our caseTimerWidgetAttributes.self. The.selfsuffix on a struct type refers to the type itself, not an instance (also known as a type object or metatype). Conversely,.selfwithin an instance method points to the instance itself.content: A closure that creates the view for the Live Activity. This view appears on the Lock Screen or as a banner on the home screen for devices not supporting the Dynamic Island.dynamicIsland: Another closure, this time for creating the Live Activity within the Dynamic Island.
struct TimerWidgetLiveActivity: Widget {
var body: some WidgetConfiguration {
ActivityConfiguration(for: TimerWidgetAttributes.self) { context in
// Lock screen/banner UI goes here
} dynamicIsland: { context in
DynamicIsland {
// Expanded UI goes here. Compose the expanded UI through
// various regions, like leading/trailing/center/bottom
DynamicIslandExpandedRegion(.leading) {
Text("Leading")
}
DynamicIslandExpandedRegion(.trailing) {
Text("Trailing")
}
DynamicIslandExpandedRegion(.bottom) {
Text("Bottom \(context.state.emoji)")
// more content
}
} compactLeading: {
Text("L")
} compactTrailing: {
Text("T \(context.state.emoji)")
} minimal: {
Text(context.state.emoji)
}
}
}
}Each closure may accept parameters, like context in both the content and dynamicIsland closures.
Parameters are delineated from the closure body with the in keyword.
context is an instance of your TimerWidgetAttributes struct, enabling customization of your rendering based on the data.
For example, dynamic data is accessed via context.state and static properties through context.attributes.
In essence, an instance of ActivityConfiguration is created by specifying the data model type, and providing two closures.
The first one outlines the Live Activity's layout when your phone is locked,
and the second for when your phone is unlocked and in Dynamic Island mode (iOS 16.1+).
The inner closures within DynamicIsland allow you to tailor the live activity layout based on its state and regions. Let's delve into these next.
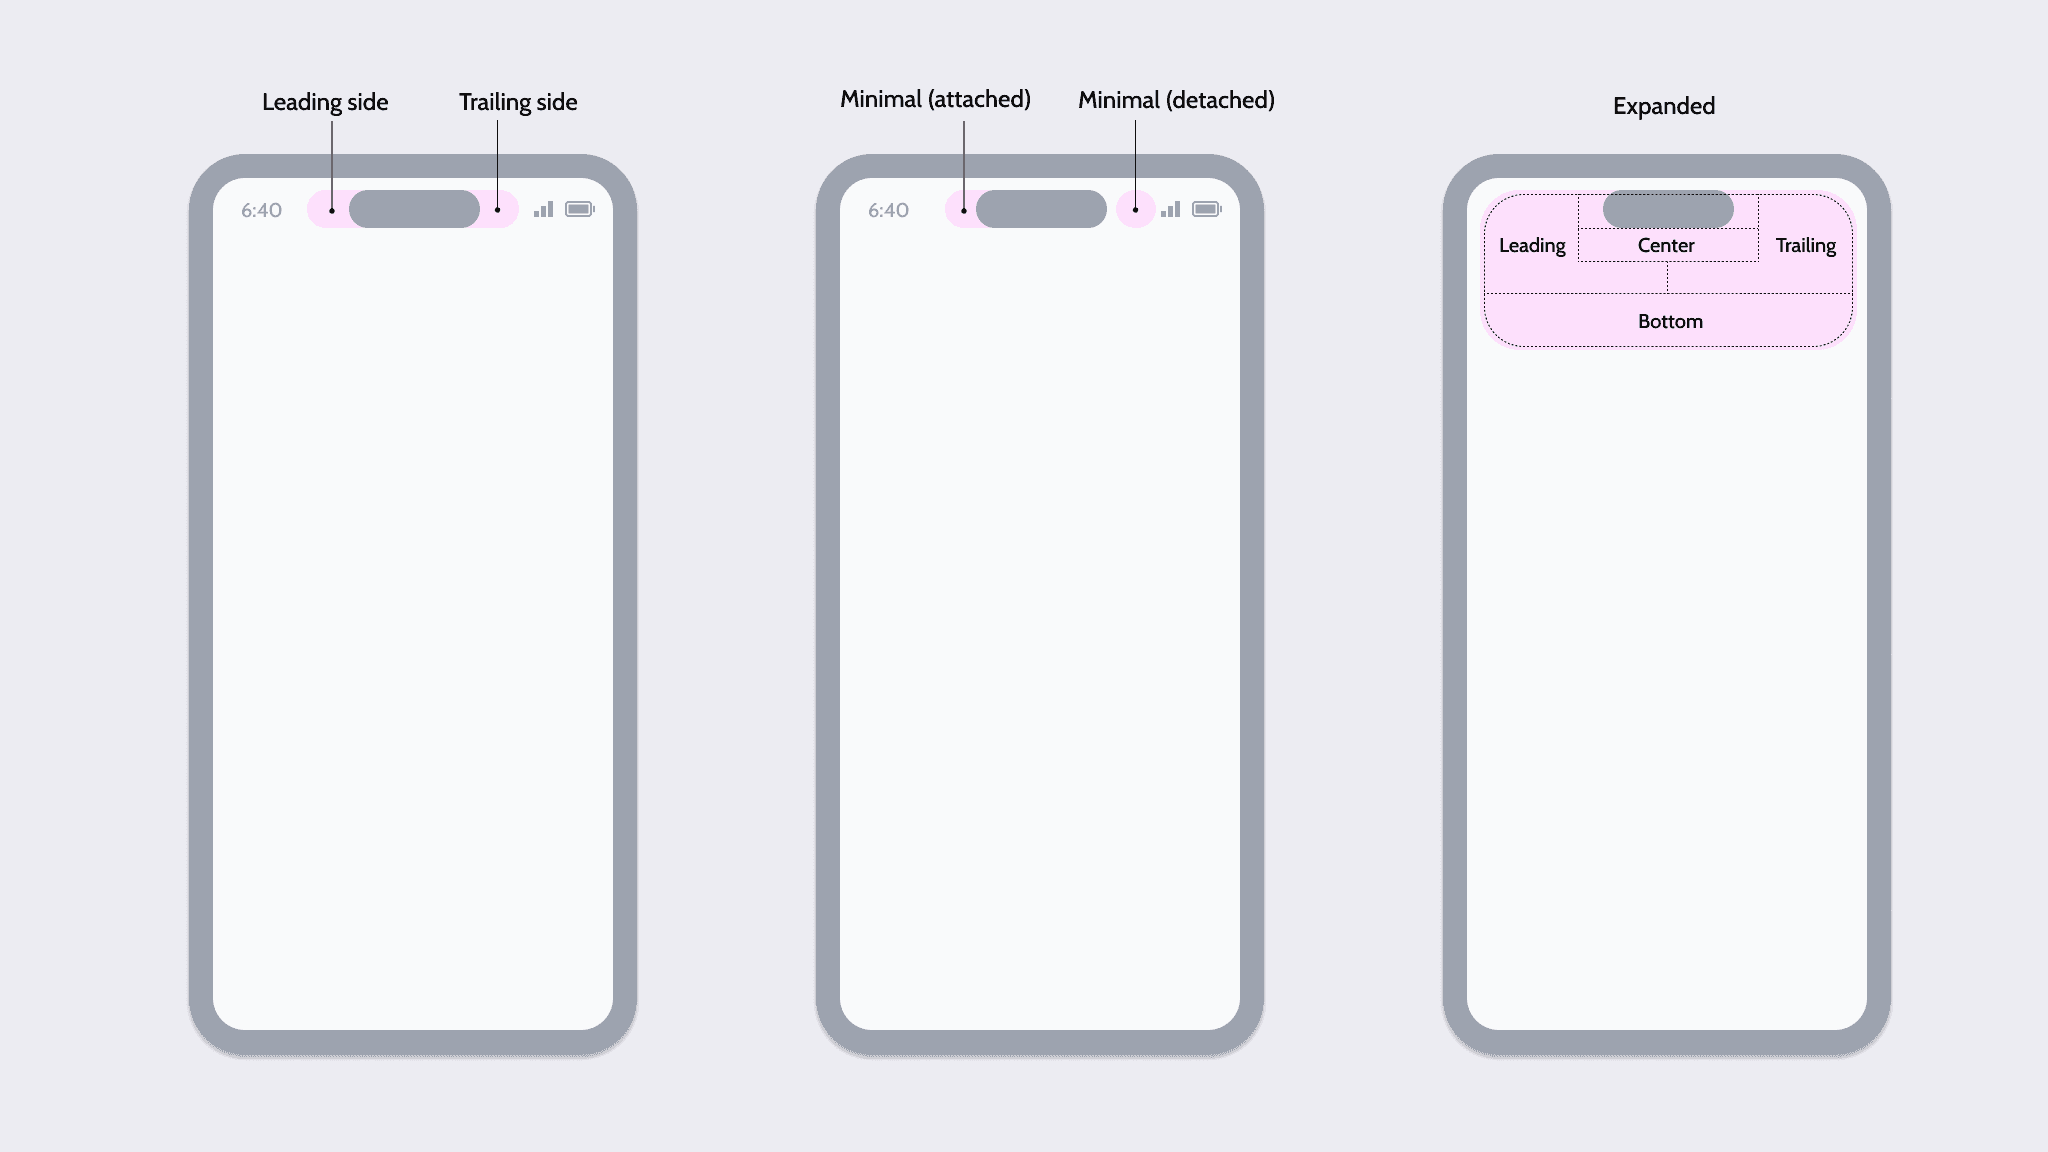
Compact
The Dynamic Island adopts a compact presentation when only one Live Activity is active. This mode features two separate elements: one positioned on the leading side of the TrueDepth camera and the other on the trailing side.
Interactions in this mode include:
- Tapping: When you tap on either element, the app opens. This is a prime opportunity to deep link to the relevant screen in your app.
This behavior is set up using the
widgetURLfunction of theDynamicIslandstruct instance. By defining the URL here, it becomes the default for deep linking from each view of the Live Activity. However, if you incorporate aLinkwithin the live activity, it will override this default URL. - Long Pressing: A long press on either section transitions the Dynamic Island from its Compact to Expanded presentation.
Minimal
In scenarios where multiple Live Activities are active, the system shifts to a minimal presentation. Here, two Live Activities are displayed within the Dynamic Island, with one attached and the other appearing detached.
Similar to the compact mode, tapping on a minimal Live Activity opens the app for more details about the event or task. Touching and holding it brings up essential controls and shows additional content in the expanded presentation.
Expanded
Activating a Live Activity in compact or minimal presentation through touch and hold prompts the system to display it in an expanded presentation. This is essentially a larger version of the compact presentation, designed to accommodate more content and information.
When designing your Live Activity, ensure that the transition from compact to expanded presentation is seamless and that layouts and information expand predictably.
Running the Preview
Now, let's take your Live Activity for a test drive. This will be the iOS-generated Live Activity from when you initially set up the widget extension. Here's how to get it up and running:
- Open the
TimerWidgetLiveActivity.swiftfile in Xcode. - Look to the right pane and find the refresh icon. Give it a click.
- This action triggers a build process to compile your code. Hold tight for a few seconds.
- Once the build completes, a simulator preview should pop up, showcasing your Live Activity in the locked screen mode.
If you bump into preview timeout errors, try to run the following command in your terminal.
xcrun simctl --set previews delete all
But what's driving this preview? Is it some kind of magic, or is there code behind the curtain? Let's take a peek:
extension TimerWidgetAttributes {
fileprivate static var preview: TimerWidgetAttributes {
TimerWidgetAttributes(name: "World")
}
}
extension TimerWidgetAttributes.ContentState {
fileprivate static var smiley: TimerWidgetAttributes.ContentState {
TimerWidgetAttributes.ContentState(emoji: "😀")
}
fileprivate static var starEyes: TimerWidgetAttributes.ContentState {
TimerWidgetAttributes.ContentState(emoji: "🤩")
}
}
#Preview("Notification", as: .content, using: TimerWidgetAttributes.preview) {
TimerWidgetLiveActivity()
} contentStates: {
TimerWidgetAttributes.ContentState.smiley
TimerWidgetAttributes.ContentState.starEyes
}This code snippet located at the bottom of the TimerWidgetLiveActivity.swift file is the puppet master behind the preview. Let's break it down:
- An
extensionin Swift is used to add new functionality to an existing class, struct, enum, or protocol type. They add convenient predefined instances ofTimerWidgetAttributesand itsContentStatefor use within the same file, mainly for previewing and testing purposes fileprivatekeyword limits access to within the same source file- The
#Previewdirective specifies a name for the preview ("Notification"), indicates it should preview the content, and uses the preview instance ofTimerWidgetAttributesfor this purpose - Inside the curly braces
{ TimerWidgetLiveActivity() }, it defines the actual widget or live activity to be previewed contentStates: { ... }: This closure defines different content states to be used in the preview. It references thesmileyandstarEyesstates defined in theTimerWidgetAttributes.ContentStateextension
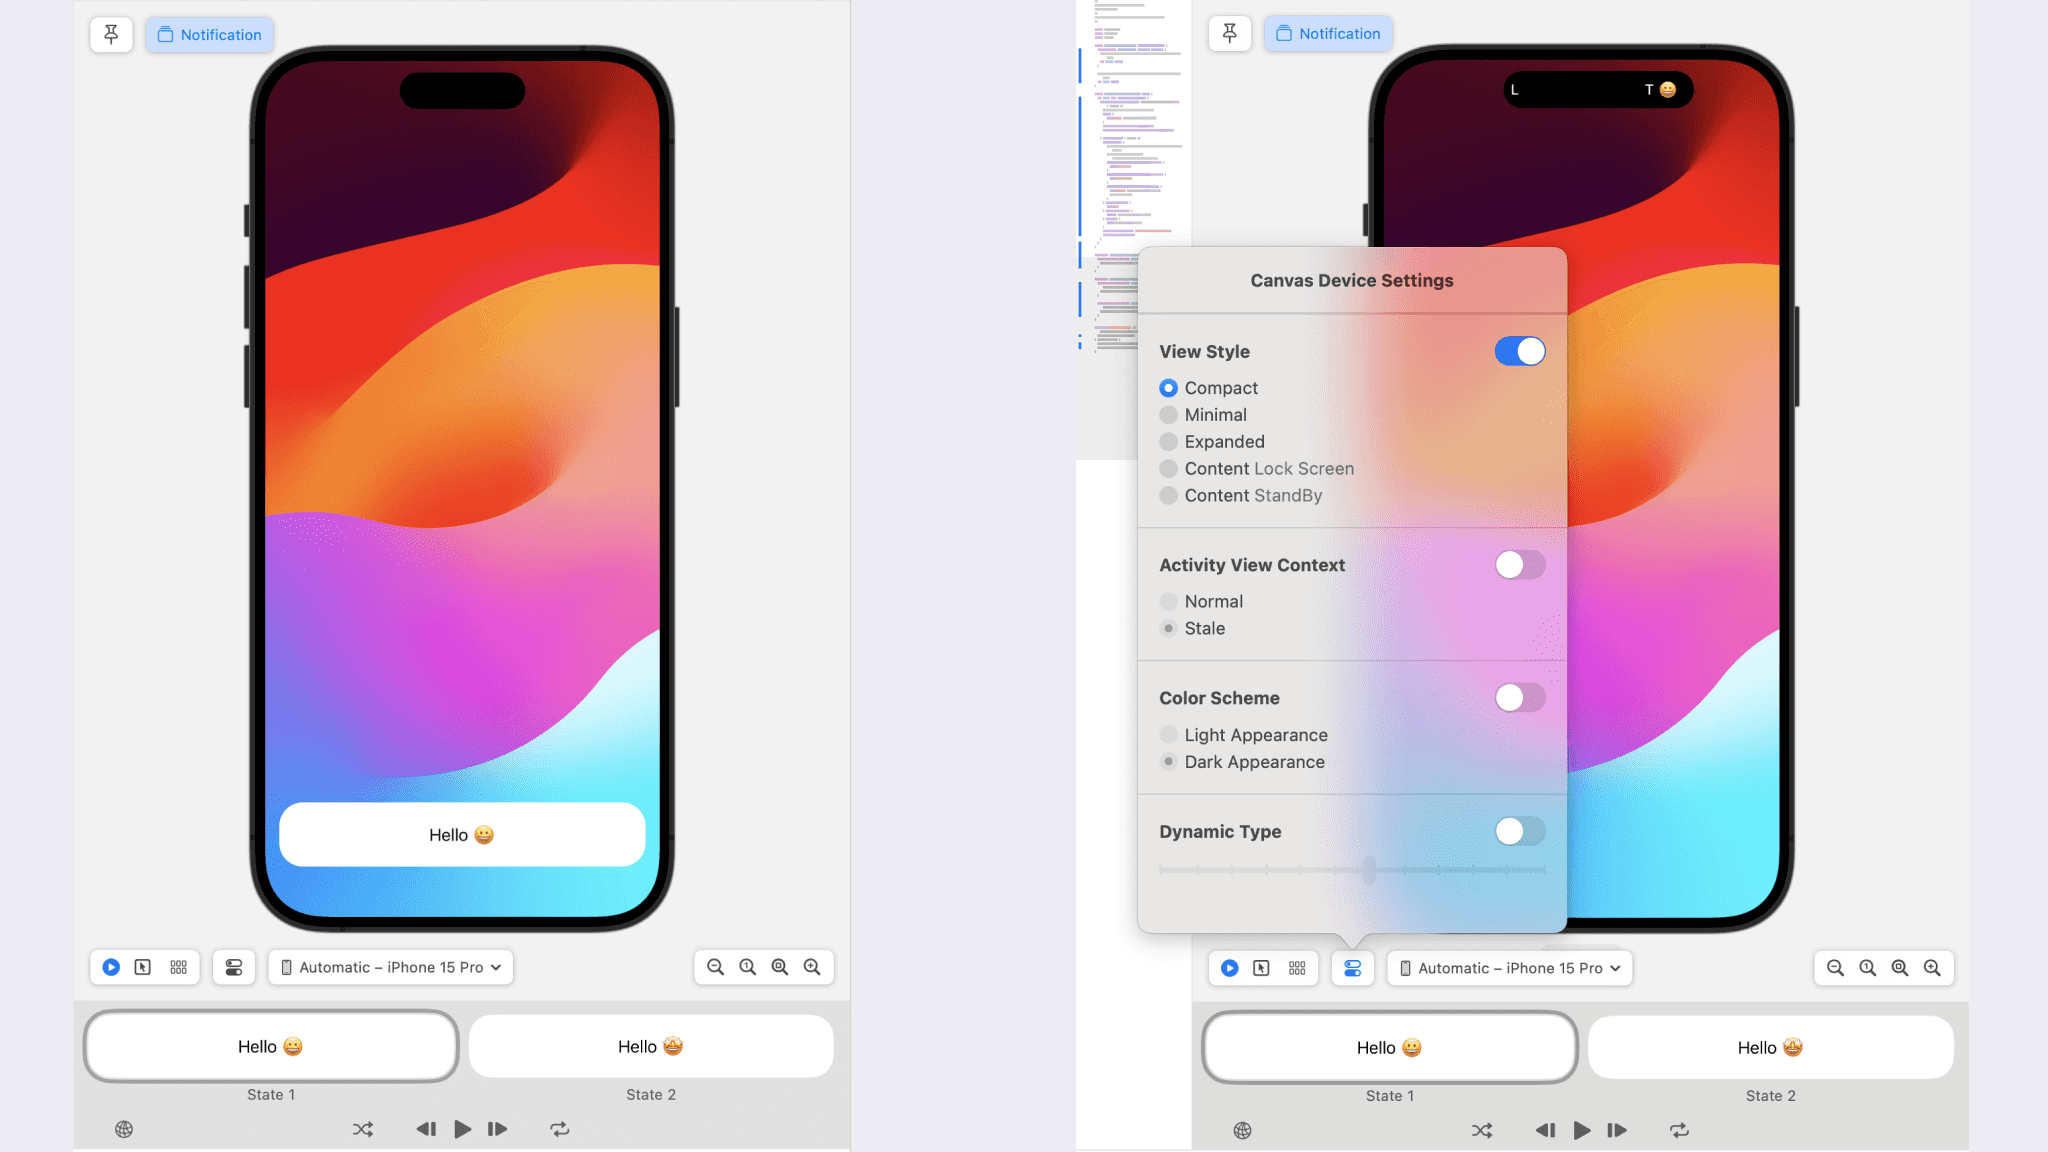
Below is a snapshot of the Preview canvas in action. Notice the second picture – it shows how you can switch up the presentation style, like rendering the Compact mode in the Dynamic Island.
Conclusion
Hey, you made it to the end - that's awesome! 🎉 I'm thrilled you stuck with me and didn't get intimidated along the way. Next time Swift comes knocking at your door, you can greet it with a knowing smile. More than that, you're now among the savvy few who can stretch the limits of React Native.
But this is merely getting the ball rolling. Part 2 of this series is where the real fun kicks in.
Let me leave you with a few tantalizing tidbits to keep you on your toes:
- You'll tailor a live activity to showcase a ticking timer.
- This timer will tick away in real-time, perfectly in sync with your app.
- You'll take your SwiftUI skills to the next level, crafting a beautiful UI for the dynamic island.
- You'll gain the power to pause and resume this timer directly from the live activity - no need to even open the app!
Until then, happy coding! ❤️

